Security
General safety regulations
- This documentation is part of the product. The documentation should be retained throughout the entire period of product use and passed on to subsequent users of the product. Ensure that any received updates or additions are also included in the documentation.
- All tasks related to the use of Lobas must only be performed by professionals who possess sufficient knowledge of the respective PC system being used.
Tasks that involve creating or modifying files on the PC system should only be carried out by professionals who, in addition to the above, have sufficient knowledge of the administration of the employed PC system.
Tasks that result in altering the behavior of the PC system within a network should only be performed by professionals who, in addition to the above, have sufficient knowledge of the administration of the specific network being used. - Adhere to applicable laws, regulations, local ordinances, industry standards, and best practices at the time of installation.
Indirect safety
- When implementing automation solutions that, in the event of an error, could cause personal injuries or significant property damage, appropriate measures must be taken to achieve a safe operating state of the system even in the event of a failure.
- All products in a network should be configured with different IP addresses.
- A PC with a DHCP server installed should never be connected to a global network. In larger networks, there is usually already a DHCP server present, and this can lead to IP address conflicts, potentially causing the network to collapse.
- Only the current security software should be used.
- All software components or programs that are not required for the intended purpose of your PC system should be uninstalled or deactivated.
¶ Functional description
Lobas (Load Balancing System), the load management solution by energielenker solutions, prevents the risk of network overloads and expensive peak loads. Lobas ensures continuous network stability, even when multiple charging stations are operating simultaneously. The limited available connection power at your location is dynamically distributed among the individual charging points by our dynamic load management system, tailored to your specific need.
¶ Lobas functionalities
- Lobas manages the total charging capacity at the location, the power per charging station or residential unit, and the distribution of the available power.
- Lobas regulates the connected loads based on other consumers such as production plants, CHPs (Combined Heat and Power), or photovoltaic systems.
- Existing storage solutions are taken into account during the power regulation process.
- Lobas utilizes schedules or prioritization, for example, for distribution vehicles, to efficiently plan the charging processes.
- Lobas enables solar surplus charging, allowing the solar power generated at the location to be used for charging operations if it is not consumed within the building.
- Lobas can process prioritizations based on RFID cards or charging techniques.
- In the web interface of Lobas, all current data is visually presented in a clear manner. Additionally, all settings for the control parameters can be configured here.
¶ First steps
¶ Required ports and protocols
¶ Lobas Incoming Ports
| Port (from-to) | Protocol | Explanation |
| 3060-3061 | TCP | Web-UI |
| 20560 | TCP | Energielenker Support (SSH) |
| 19520 | TCP | OCPP connection charging station |
| Depending on connected components. Usually 502 | TCP | Freely programmable ports for Modbus TCP server |
¶ Lobas outgoing ports
| Port (from-to) | Protocol | Explanation |
| 22 | TCP | Update-Server Lobas |
| 443 | TCP | Update-Server-Lobas and OCPP backend |
| 10110 | UDP | Remote support Energielenker |
| 502-503 | TCP | Modbus charging station |
| 9522 | UDP | UDP Multicast for components that communicate via UDP Multicast |
¶ Sign in!
Lobas is set to DHCP by default.
- To access the web interface, enter the IP address displayed on Lobas into the URL bar of your internet browser.
- The following data is required for logging in:
| username: | admin |
| password: | admin01 |
The input is confirmed by clicking log in now button.
After the initial login, the admin password should be changed. This can be done under the configuration/advanced navigation point. A detailed explanation can be found in Chapter 4.1.6.
¶ To activate the license
If no license has been uploaded yet, a window will open that looks like the following image. At this point, it is not possible to create charging points. To upload a license, the licenses option must be selected, under configuration. in the navigation bar.
The following window will open:
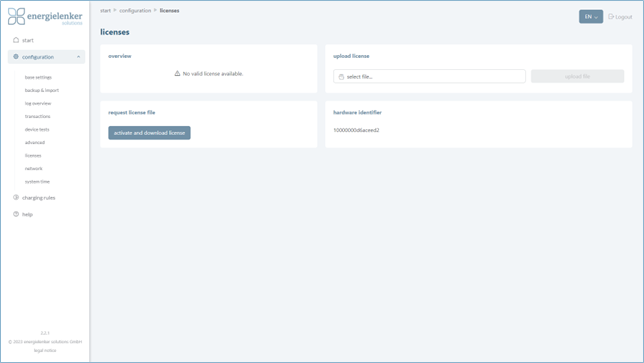
At this point, it is possible to upload the licenses. In chapter 4.1.8 License these steps are described in more detail.
- Click on add, to add charging stations and meters. [Chapter 3.1]
- Through the configurations field in the navigation bar, system settings can be configured, and devices can be tested. [Chapter 4.1]
- Under the field charging rules, charging rules can be determined. [Chapter 4.2]
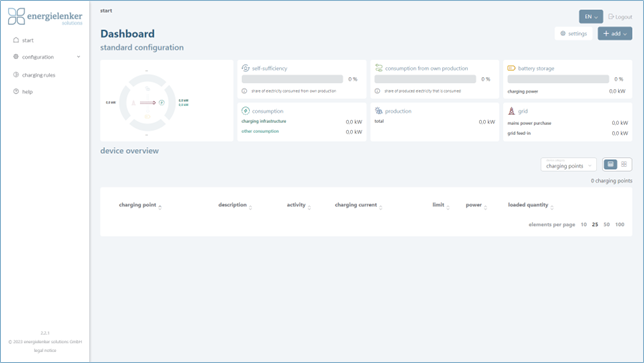
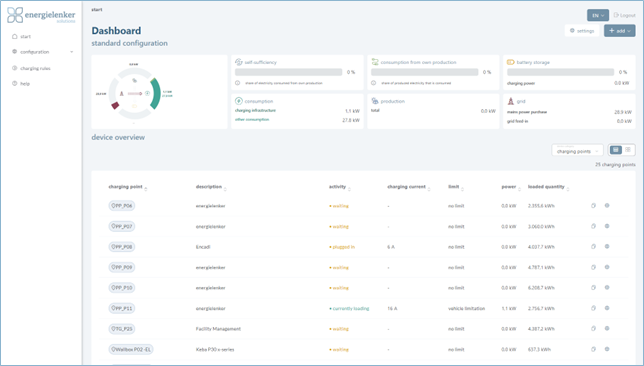
¶ Dashboard
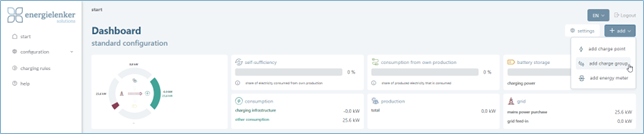
By clicking on start in the navigation bar (on the left), access to the Dashboard is granted. The Dashboard provides a general overview of the system.
Current consumption and production values can be viewed here.
¶ Add
On the right, charging points, charging groups, or meters can be added using the add button.
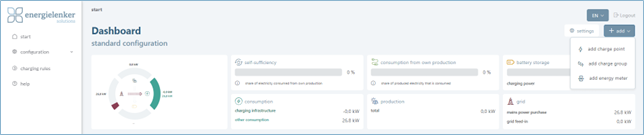
Note:
Editing devices is only possible in one tab/browser at a time. Editing from multiple tabs/browsers simultaneously can lead to problems.
¶ Adding A Charge Point
By clicking on the add charge point button (top right), charge points can be added.
The following screen opens in which the data for the charger can be defined:
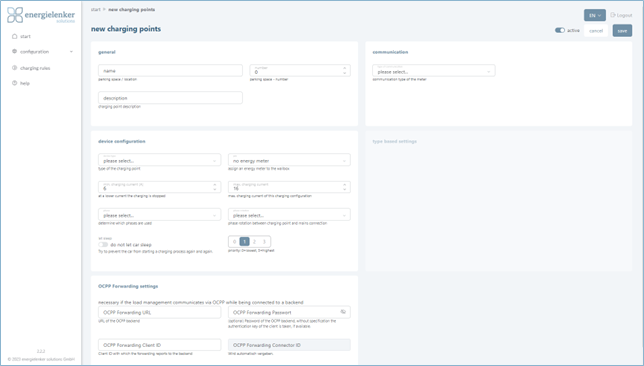
| General | |
| Name | The designation that the charging point should have. This is displayed in the device overview. |
| Description | Short description of the charging point. The description is displayed in the device overview. |
| Sorting index | Based on this, the charging stations are sorted in the overview. |
| Communication (between charge point und Lobas) |
|
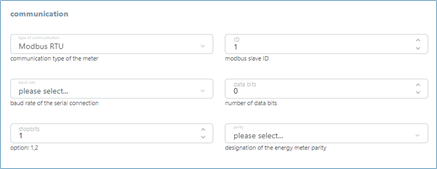
| Modbus RTU |
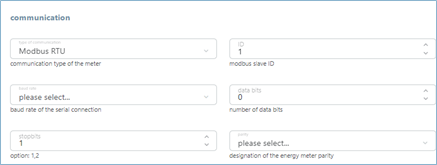 Enter the ID (Modbus-Slave-ID), the baud rate (e.g., 9600), the number of data bits (e.g., 8), the number of stop bits (e.g., 1) and the parity (e.g., None) according to the device documentation. |
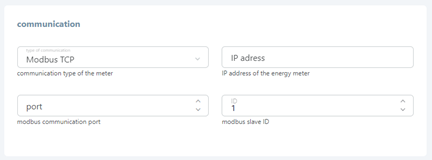
| Modbus TCP |
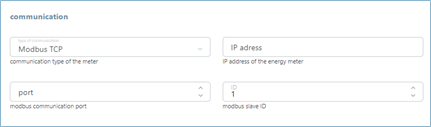 When using an Ethernet connection, enter the IP address, Port, and ID here. |
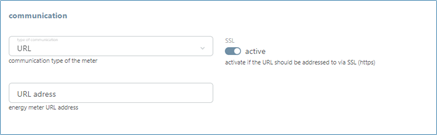
| URL |
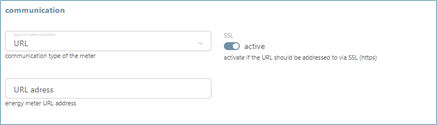 The URL address must be entered in the URL address field. For unencrypted URL, the slider should be set to „Inactive“ and for encrypted URL (SSL) to „active“. |
| OCPP |
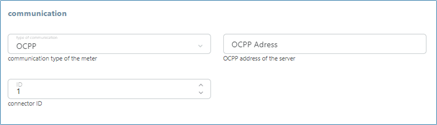 The OCPP address is entered here. The ID is the Charge Point ID. |
| Device Configuration | |
| Device type | The dropdown field contains various devices. Depending on the selection, the following fields can change or additional fields can be added. |
| Pin | Here, there is the option to assign a previously created meter to this charger. If there is no meter at this device, the setting can be left on no energy meter. |
| Min. charging current (A) | Here, the minimum charging capacity that this charging point supports can be entered. The minimum current for charging is at least 6 A. Note: Please note that some vehicles require a higher value to start charging. |
| Max. charging current (A) |
Indication of the maximum charging current supported by this charging point. The current may be lower depending on whether a lower-power cable is connected. The standard preset current is 16 A, which corresponds to the current consumption per phase of an 11 kVA charge point. Note: If the charging point has a higher charging power, the value must be increased accordingly. If the value is not increased, the possible power of the charging point is not used. |
| Phase | From this selection field, you can select the phases the meter uses or “automatically” detects when charging based on the meter values. |
| Phase rotation |
To ensure that multiple vehicles can be charged at different charging points at the same time, it is essential that the phase position is rotated in comparison to other charging points during installation. The setting of this phase rotation is done here.
Recommendation: Use a consistent approach, e.g.: 1st charging point 0 degrees, 2nd charging point:120 degrees, 3rd charging point:240 degrees, 4th charging point: back to 0 degrees, etc. Lobas detects phase asymmetries if the charging points have corresponding meters or meters are connected that can output the current of the individual phases. In the event of an asymmetry that is greater than 4.5kW, Lobas automatically reduces the charging current of this charging station or temporarily switches off charging completely until the phase symmetry is restored.
Example: A vehicle charges on phase L1 and the charging point is connected with a phase rotation of 120 degrees, then phase L2 in the building is loaded and the load displayed in the web interface. |
| Interrupt standby | Some vehicles immediately attempt to recharge as soon as the battery level falls just below the charging maximum. Due to this constant short recharging, the vehicle does not enter an energy-saving idle state, which means that the 12V starter battery may be discharged the next morning. The load management system detects this and then blocks charging for a longer period of time so that the vehicle can go into hibernation mode. |
| Priority | Priority when charging. Standard is 1. Priority: 3=highest, 0=lowest. |
| OCPP Forwarding Settings | |
| OCPP forwarding URL | The URL to which Lobas forwards the OCPP communication to the backend. |
| OCPP forwarding Password | The password for the OCPP backend. Without specification, the client's authentication key is adopted, if available. |
| OCPP forwarding Client ID |
Client ID, with which Lobas reports to the backend. |
| Connector ID | Display of the automatically assigned Connector ID. |
| Active (top right) |
|
¶ Adding a charging group
A charging group can be created using the Add Charging Group button (top right). This is used to define group configurations and represent the total power of a group.
The following form opens:

| General | |
| Name | A name for the charging group can be entered here, which appears in the device overview on the dashboard. |
| Description | A description for the charging group can be entered here, which appears in the device overview on the dashboard. |
| Sorting index | A freely selectable number can be entered here to be displayed in the overview, such as a number for the parking space where consumption should be measured. If not sorted by status, the overview will be sorted by these numbers. |
| Group configuration | |
| Max. charging current per phase (A) |
The maximum charging capacity per phase, that this charging group supports, can be entered here. The capacity may also be lower depending on whether a lower-capacity cable is connected. The default setting is 16 A, which corresponds to the power consumption per phase of an 11 kW charging point. Note: If this value is not increased for a larger charging point, the full possible capacity of the charging point will not be utilized. |
| Max. total charging capacity (A) | The maximum charging capacity that this charging group supports can be entered here. |
| Parent group | To make this charging group subordinate to another one, a higher-level charging group can be selected here. Any number of levels can be created. |
| Assignment | |
| Charging points | The charging points to be assigned to the group can be selected here. A search field is available for quickly finding charging points. |
| Energy meters | The meters to be assigned to the group can be selected here. A search field is available for quickly finding charging points. |
¶ Adding an energy meter
Meters can be set up using the add energy meter button (top right).

The following form opens:
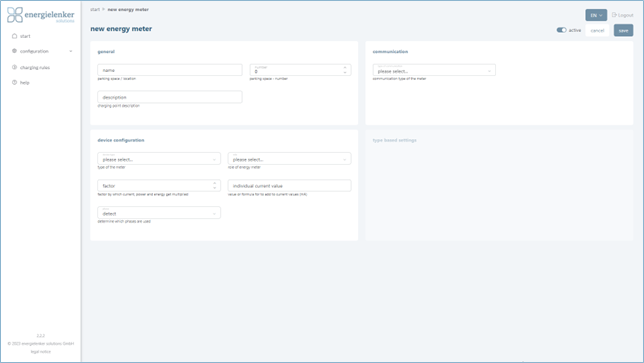
| General | |
| Name | The designation that the energy meter should have. This is displayed in the device overview |
| Description | Short description of the charging point. The description is displayed in the device overview |
| Number | Based on this, the charging stations are sorted in the overview. |
| Communication (between energy meter and Lobas) |
|
| Modbus RTU |
 Enter the ID (Modbus-Slave-ID), the baud rate (e.g., 9600), the number of data bits (e.g., 8), the number of stop bits (e.g., 1) and the parity (e.g., None) according to the device documentation. |
| Modbus TCP |
 When using an Ethernet connection, the IP address, port and ID are entered here. E.g. the IP address 192.168.1.20 in the first field and 502 in the Port field. Which Modbus slave ID, IP address and port is used can be found in the device documentation. |
| URL |
 The URL address must be entered in the URL address field. For unencrypted URL, the slider should be set to „Inactive“ and for encrypted URL (SSL) to „active“. |
| Device Configuration | |
| Device Type | The device is specified using the selection list. In Lobas, several different devices can be found that are supported. This list will be expanded over time. The virtual meters are internal Lobas meters that sum up certain power values so that they can be clearly displayed in the overview. Depending on the selection, the following fields can change, or additional fields can be added. |
| Role |
Here, the role of the meter is assigned. Display: The meter is for display purposes only and is not included in the power calculations. |
| Factor | Factor by which current, power, and energy are multiplied. |
| Individual current value (A) | Value or formula to add to current values (A). |
| Phase | Indication of the phases that the meter uses. |
| Active (top right) |
|
Note: Solar inverters also count as meters.
These can often output the currently generated power via Modbus, like a meter.
Tip for battery systems:
If a meter is assigned the role of “solar battery”, “home battery” or “battery overall” the application attempts to minimize export to and import from the grid. In this case, a battery that is discharging (the meter shows negative power values) is considered a generator, i.e., this energy is available for charging the vehicle. In contrast, a battery that is charging (the meter shows positive power values) is not considered a load, because the battery stops charging immediately when the charging power is used to charge the electric vehicle. The application ignores the consumption for meters with the “solar battery” role.
If the battery system does not have a bidirectional meter, an external meter can be installed, preferably a bidirectional Modbus meter.
¶ Device overview
In the device overview, you can choose between two views: the list view and the tile view. Both are discussed in the following two subchapters.
¶ Charging points
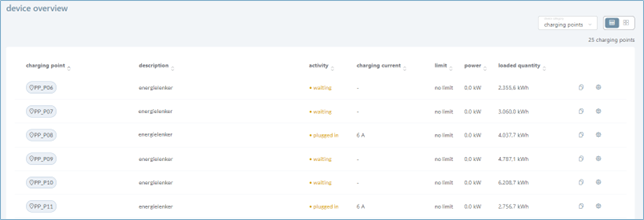
List view:
Tile view:
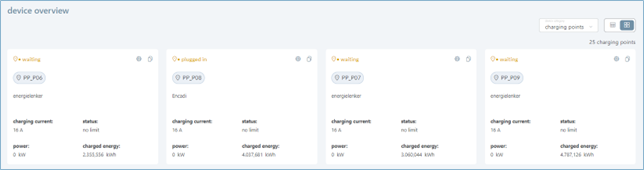
| Charging point | The designation that was assigned during the creation of the charging point is displayed here. |
| Description | Short description. |
| Activity |
The status of activity of the device is displayed in the top line:
|
| Charging current | Displays the minimum charging current that was specified during the creation of the charging point. |
| Limit/Status |
|
| Power | The currently drawn charging power in kVA. |
| Loaded quantity | Displays the total charged power in kWh |
| Duplicate this device |
 Charging points can be duplicates using the Duplicate this devices function to create similar ones. |
| Edit this device |
 The settings of the charging points can be changed using the edit this device function. |
¶ Energy meter
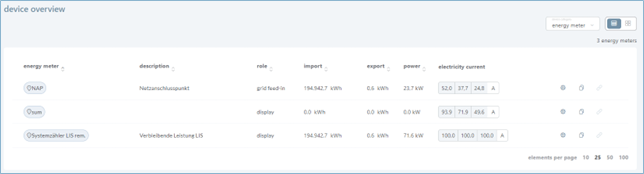
List view:
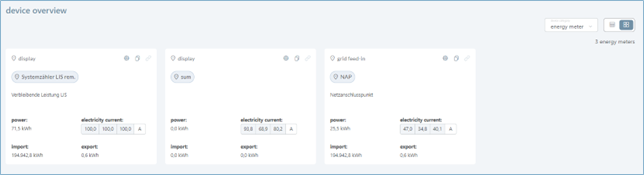
Tile view:
| Energy meter | The designation that was assigned during the creation of the energy meter is displayed here. |
| Description | Short description. |
| Role | The role that was assigned to the energy meter during the creation of it is displayed here. |
| Import | The imported energy in kWh |
| Export | The exported energy in kWh. |
| Power | The current power in VA is displayed here. |
| Electricity current | Current intensity: on each individual phase, in A.. |
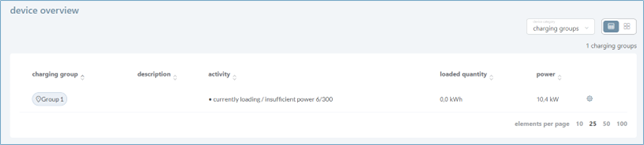
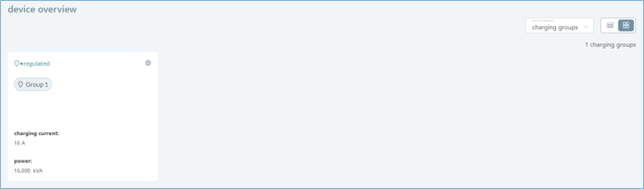
¶ Charging Groups
List view:
Tile view:
| Charging group | The designation that was assigned during the creation of the charging group is displayed here. |
| Description | Short description |
| Activity |
The status of activity of the device is displayed in the top line:
|
| Loaded quantity | Displays the total charged power in kWh. |
| Power | The currently drawn charging power in kVA. |
| Edit this device |
 The settings of the charging points can be changed using the edit this device function. |
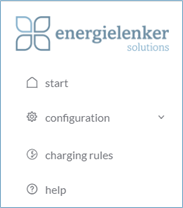
¶ Navigation Bar
| Through the navigation bar on the left side, settings can be made, and charging rules can be define. |
|
¶ Configuration
|
In the Configuration section, there is the option to make the settings visible in the screenshot or to view data. The individual points are explained in the following chapters. Note:
|
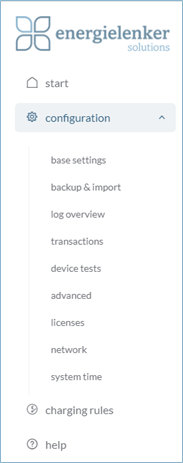 |
¶ Base Settings
After clicking on the Base-Settings button in the configurations-menu, the following form for editing the basic settings open.
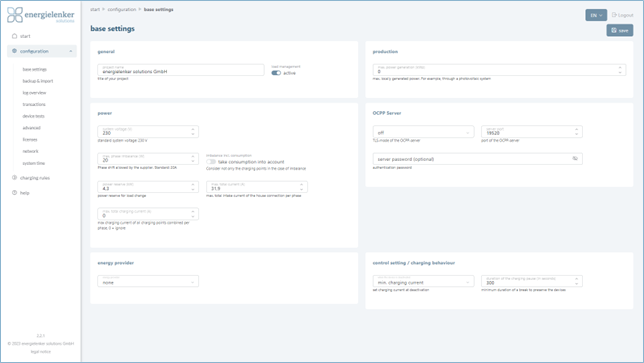
| General | |
| Project Name | The title of your project or site can be entered here. |
| Load Management |
The operating mode can be set here:
|
| Power | |
| System Voltage (V) | The voltage between the line conductor and neutral conductor can be entered here. In Germany, this voltage is normally 230 V. |
| Max. Phase Imbalance (VA) | The max. phase imbalance can be entered here. The phase imbalance allowed by the public utility is displayed; the default value is 4600 W Note: Please ask your provider! In Germany, this is normally 4600 W. |
| Imbalance Incl. Consumption | If the slider is on, not only the charging points are considered in the event of an imbalance |
|
Power Reserve (kVA)
|
In the regulation of power, fluctuations may occur due to short-term power peaks. Therefore, a reserve should be specified in this field, which is subtracted from the grid connection power and thus not used. During the regulation, Lobas checks whether there is still an overrun of the existing grid connection power. The reserve should be chosen higher, the less information is available about the use of the individual phases (through suitable meters). |
| Max Total Current (A) | The maximum available grid connection power can be specified. This power is available to the grid connection, including all consumers and charging stations. |
| Max. Total Charging Current (A) | The maximum power of the line can be specified if it was laid exclusively for charging electric vehicles. This setting prevents overloading of the fuse/line. |
| Production | |
| Max. Power Generation (kWp) | The maximum generation power of all existing power generators can be specified here. |
| OCPP server | |
| TLS-Mode of the OCPP server |
In the selection field, the Transport Layer Security (TLS) encryption of the OCPP server can be chosen:
|
| Server Port | The TCP/IP port of the OCPP server in Lobas can be displayed here. The default is always set to 19520 and can be edited if necessary |
| Server Password | The password for logging into the OCPP server can be entered here. |
| Energy Provider | |
| Energy Provider | For electricity price-dependent charging, one of the predefined providers can be selected. |
| Control Settings / Charging Behavior | |
| At Deactivation |
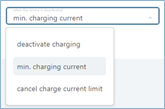 If a charging station is deactivated in the configuration menu, this checkbox informs Lobas of the process that should then take place. Three modes can be selected, determining whether charging is completely deactivated or whether the charging station is set to a minimal or maximal power value. |
| Duration of the Break (s) | For power reduction, this lets you specify the minimum duration of a pause during which no charging is performed. |
¶ Backup & Import
Files, such as meter type, load management, and the entire configuration, can be uploaded or downloaded here.
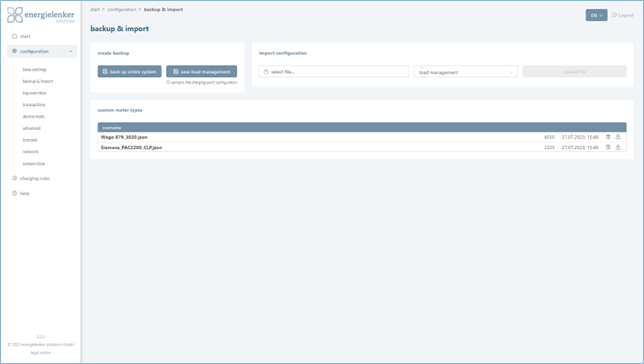
| Create Backup | |
| Back Up Entire System | Here, all data, including the configured devices and license, can be backed up, creating a complete backup that can be used to set up a new Lobas. Transaction logs are not saved. Licenses are hardware-bound. To use licenses on other devices, the dealer should be contacted. |
| Save Load Management |
By clicking on the button, the load management is saved. This includes:
|
| Import Configuration | The file to be uploaded can be selected and the type determined. If the file is faulty or the wrong type has been chosen, an error will appear. |
| Custom Meter Types | Here, there is an overview of the already uploaded meter definition files. |
¶ Log Overview
A decision must be made regarding which data should be logged by Lobas. For each area, there is the option to log errors, warnings, or information.
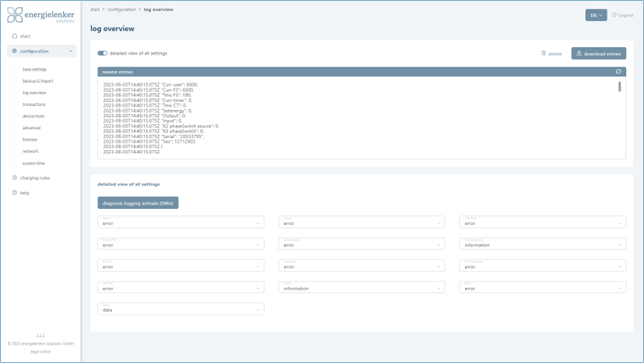
| Detailed View of All Settings | Here, settings can be made manually. |
| Detailed View of All Settings | When the slide switch is activated, "Detailed view of all settings" appears. |
| Refresh |
 The data in the „newest entries“ section is updated. |
| Delete | All recorded data will be deleted. The data should be downloaded beforehand for archiving |
| Download Entries | A CSV file with the complete log is saved to the download directory. |
¶ Transactions
Here it is decided whether loading processes are to be recorded. These are exported as a .CSV file.
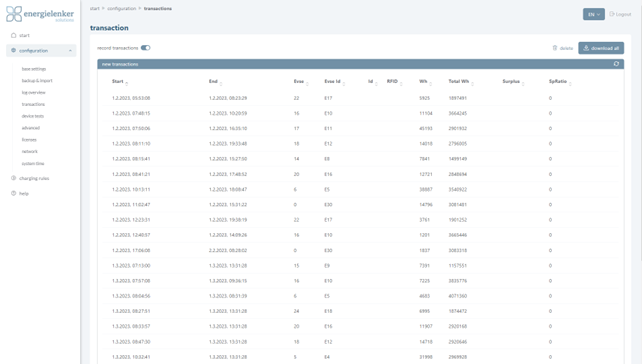
| Record Transactions | If the slide switch is set to "Active", transactions are recorded. |
|
Refresh  |
The log is loaded when the page is opened. To update the data, you must click Refresh. |
| Delete | All recorded data will be deleted. The data should be downloaded beforehand for archiving. |
| Download Entries | All recorded loadings are saved in CSV format in the download directory. |
The following information is listed in the CSV file.
| Start | Start date and time of the charging process |
| End | End date and time of the charging process |
| EVSE | Number of the charging point |
| EVSE Id | ID of the charging point |
| Id | User ID |
| RFID | Number of the RFID or the PIN |
| Wh | Power of the last charging process |
| Total Wh | Total meter reading since commissioning (not supported by all charging stations) |
| Surplus | 0 = no surplus charging, 1 = surplus charging |
| SpRatio | Percentage specifying how much of this transaction’s charged kWh a solar surplus was able to cover. |
¶ Device Tests
In this area there is the possibility to test devices.

¶ Tesla TWC
For the Tesla Wall Connector Gen 2, which is addressed via the RS 485 interface, an ID is required that must be set in the charging point configuration. This ID can be determined here by specifying the COM port to which the Tesla charge point is connected. For Lobas this is always the specification COM1.

¶ Modbus
This dialog element can be used to send individual Modbus commands to specific devices. Here the address and ID of the Modbus device must be entered in the same way as in the configuration of meters and charging points in the fields "Address" and "Slave ID".
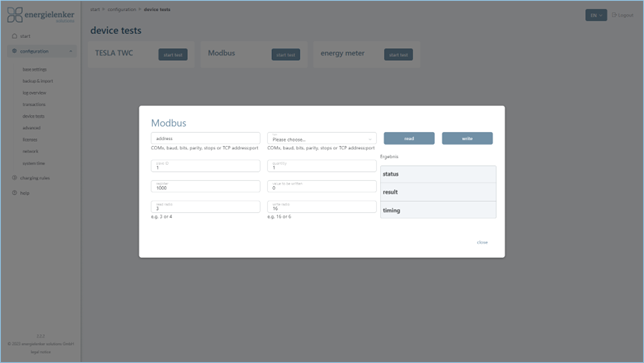
| Address | Address of the Modbus |
| Type | Defines the data type stored in the Modbus registers. |
| Slave ID | Here the slave ID can be defined. |
| Quantity | Defines how many of such data types are to be read from the registers. When writing, the value to be written must also be specified. |
| Register | Here the register number can be specified decimal or hexadecimal by prepending 0x, from which value is to be read or written. |
| Value to be Written | The "Value to be written" is to be entered here. |
| Read Radio | The read function is entered here. Ex. 3 or 4 |
| Write Radio | The write function is entered here. E.g. 6 or 16 |
| Status | The results are displayed here |
| Read or Write | This configures the read or write function number. The result appears in the Result and Status field. |
¶ Energy Meter
In this menu the connected meters can be tested. For this purpose, the fields must be filled in. To start the test, click on run test.
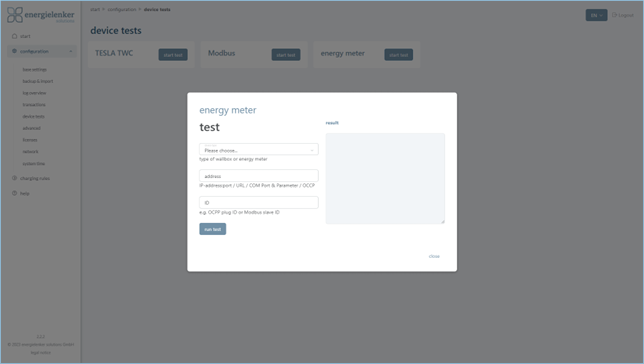
| Device Type | The type of device to be tested must be selected. |
| Address & ID | The address & the ID must be provided. |
¶ Advanced
When Lobas is shipped, the username and default password are given.
| Username: | admin |
| Default Password: | admin01 |
The username cannot be changed. The admin password should be changed the first time the device is used.When the device is reset to factory settings, the password is also reset.
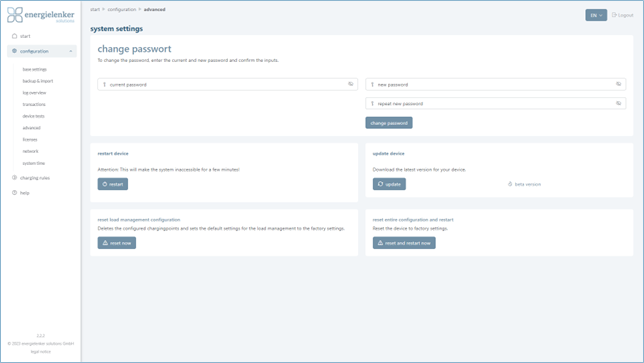
| Change password | To change the previous password, the old password must be entered once and the new password twice. To confirm the change, the change password button must be pressed. |
| Restart Device | Clicking on restart first shuts down the device and then starts it up again. A note appears in the information window for this purpose. |
| Update Device |
Click on the update button to update the device with a newer software version. An information window opens. The currently installed version is checked for updates and updated directly in case of deviations. This process can take a few minutes. Additionally, a beta version can be loaded. The device needs an Internet connection. |
| Reset Load Management Configuration | Clicking reset now removes the configured charge points and resets the basic load management settings to factory defaults. |
| Reset Entire Configuration and Restart | Clicking reset and restart now resets the device to factory settings. |
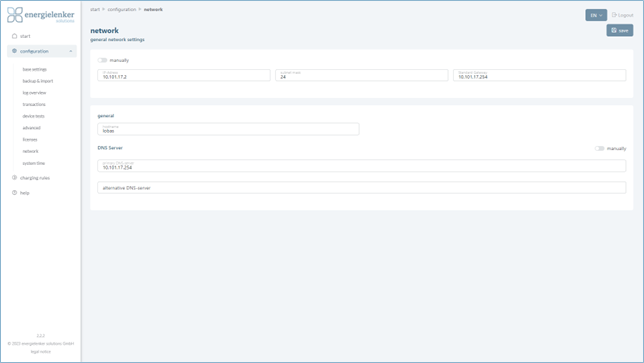
¶ Network
The general network settings can be found here.
Under the Network menu item, the DHCP and DNS IP addresses can be assigned automatically or set up manually, as specified in the delivery state.
The default setting is DHCP.
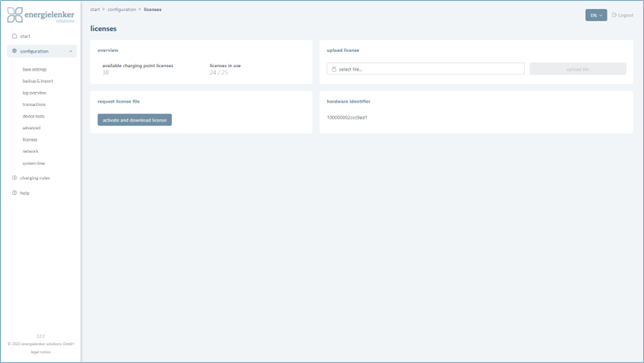
¶ Licenses
Here licenses can be uploaded and an overview of the active licenses and charge points is visualised. When a license key is uploaded, the overview adjusts accordingly.
¶ System Time
Settings for the system time can be made under the corresponding menu item. Here you can decide whether the system time should be updated automatically via the NTP server. If no automatic update is used, make sure that the system time is checked regularly.
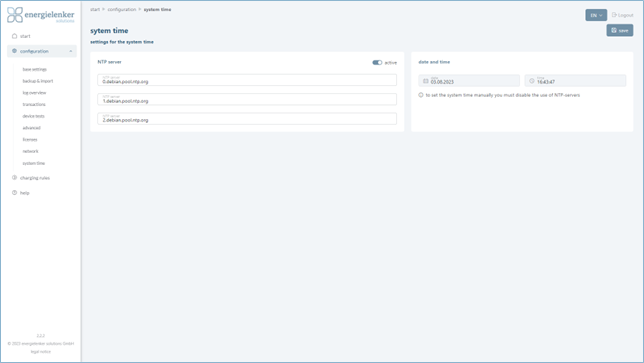
Caution: The correct time is important for communication with an OCPP backend.
¶ Charging Rules
Lobas evaluates the charging rules associated with the charge point every few seconds, including the stored users. Each set of charging rules for charge point and user is searched in the order entered. The order of the rules can be changed using the up and down buttons.
The first matching rule from the charge point and the first matching charging rule from the user are searched first. Lobas selects the smaller charging rule if both a rule from the charging point and one from the user match.
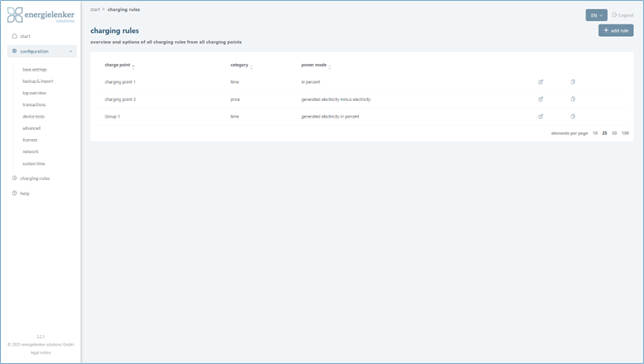
If a charging rule applies, it is applied, and the following rules are ignored. If at least one charging rule is specified but does not apply, charging current 0 applies. This then applies to the rule set of the charging point and the rule set of the user.
For each rule, weekdays can be selected for which it is to apply.
Note:
Editing devices is only possible in one tab/browser at a time. Editing from multiple tabs/browsers at the same time may cause problems.
¶ Add Rule
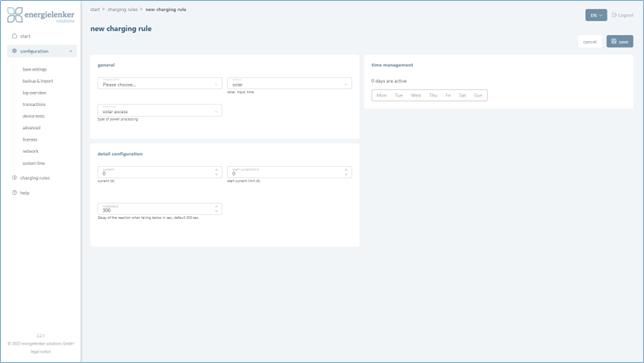
| General | |
| Charging Point | The charging point for which a charging rule is to be created must be selected here. |
| Category | The various categories are discussed in the following subchapters. |
| Power Mode | There are five power modes. The explanation of these, is in the table on the next page. |
| Detail Configuration | Change for the different categories. The detailed configuration is described in the following chapters. |
| Time Management | Here you can select the days for which the rule should apply. |
Each charge control requires a power mode and a dependent power value.
For the rules, the power mode is to be selected and the power value (under detail configuration) is to be defined.
| Power Mode | |
| Total | The value is the absolute (maximum) amperage (input in A) for charging. |
| In percent (%) | The value is a percentage of the maximum power of the charging point. |
| Total generated electricity | The value in the Current (A) field is ignored and the total solar power is taken as the charging power. |
| Generated electricity in percent (%) | Percentage of generally specified electricity taken for charging (e.g., percentage of grid-connected power or photovoltaic generation). |
| Generated electricity minus electricity | The charging power is equal to the solar power minus a fixed value, current (A). |
| Solar excess | Vehicles are only charged when there is a surplus of solar power. |
¶ Time
The Time category can be used to specify loading within specified times, e.g.:
Example 1:
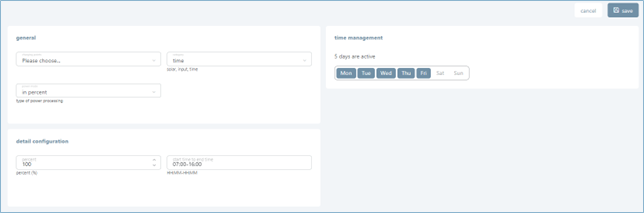
| Weekdays: | Mon-Fri | Power mode: | in percent (%) | |
| Time: | 07:00-16:00 | Power value: | 100 |
Example 2:
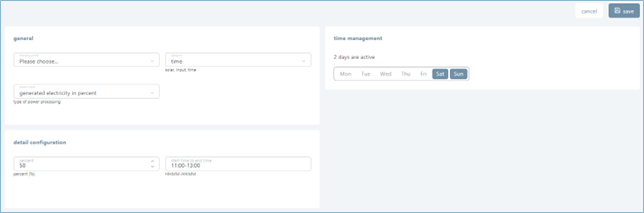
| Weekdays: | Sat-Sun | Power mode: | Generaded Electricity in Percent (%) | |
| Time: | 11:00-13:00 | Power value: | 50 |
¶ Solar
Lobas can be used to make settings that allow the car to be charged only when solar surplus power is available. Surplus means: generation minus consumption. It should be noted that due to control deviations in the limit range, a slight grid draws or feed-in can occur.
Example generated electricity minus electricity:
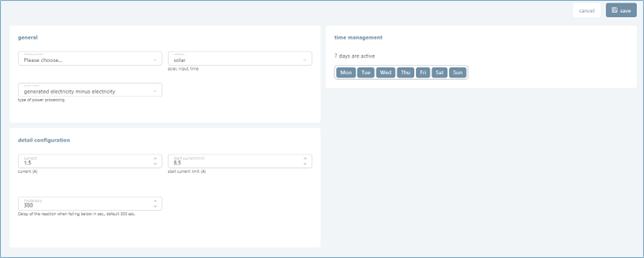
| Power mode: | Generated electricity minus electricity | Start current limit (A): | 8,5 | |
| Current (A): | 1,5 | Hysteresis (Sek.): | 300 |
Charging takes place when at least 8.5 A of solar power is available. 1.5 A remain reserved for the remaining consumption.
In both control cases, a maximum undercut time can be specified. This causes the rule to be applied for the set time anyway, even if the current limit is undershot during this time. This prevents charging from being interrupted in the event of short-term fluctuations.
To be able to read the solar surplus, the virtual meter "Surplus (VM)" must be set up in Lobas. If the virtual meter "Grid Demand (VM)" is set up, it is possible to see how much electricity is currently being drawn from the grid.
Tip: To ensure that the car is fully charged the next morning, a time-based rule should be specified in addition to the Surplus rule:
Time, Start: 21:00, End 6:00, Current 6A.
To apply this rule, create a rule from 21:00 to 23:59 and a rule from 00:00 to 06:00 for the following day.
This rule controls that the charging infrastructure is fully charged overnight if this has not already been done. The electricity for this is then drawn either from the grid or from a storage facility.
The surplus electricity is the electricity that would be fed into the grid. To be able to determine this value, Lobas must measure it. The following option is available for this purpose:
Setting up a meter with the role of "mains power supply":
For this purpose, a (bidirectional) meter should be installed at the transfer point of the grid connection. If the meter shows negative values, power is fed in. This power can be used for surplus charging. Suitable meters are e.g., Modbus meters or internal grid reference meters of your solar system.
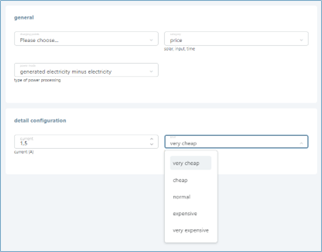
¶ Price
If the electricity price is equal to or less than a value in EUR, charging is started. Lobas currently supports Awattar and Tibber as providers for a variable electricity price.
In order for the price-based charging rule to be usable, the energy provider must be selected in Lobas under configuration > base settings.
The OAuth token must be requested for the provider Tibber. If Tibber is selected as the energy provider in the configuration, a web link becomes active to generate the token.
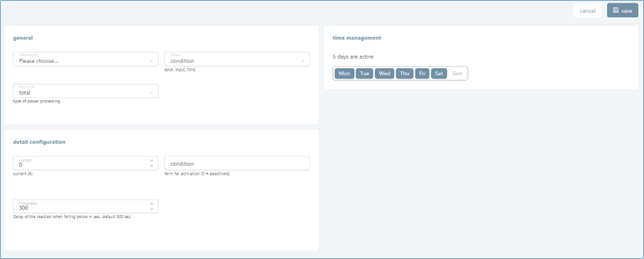
¶ Condition
The condition determines whether loading is active or not.
A formula (see Formulas) can be used to define when the load rule is to be active. If the formula returns a value not equal to zero, the load rule becomes active. It becomes inactive when the formula returns zero and the undercut time (delay time) has expired. Formulas can be used to query counter values and variables.
¶ Formula
Lobas allows dynamic evaluation of formulas. Counters of type "Expression" and loading rules of type "Formula" have this functionality. This can be used to set up meters, calculate values from other meters or charge points, and display and hold them ready. By means of formulas, the charging rules can dynamically calculate the charging current and access meters and charging points (including meters of the type "Expression").
The following operations are possible with the formulas:
| + - * / | Addition, subtraction, multiplication, division |
| ^ | Power calculation, e.g. 10^2 = 100 |
| min(x,y) | Minimum of x and y, more than 2 arguments possible |
| max(x,y) | Maximum of x and y, more than 2 arguments possible |
| abs(x) | Absolute value of x, e.g. abs(-2) = 2 |
| sart(x) | Square root of x |
Furthermore, the following logical expressions are possible:
| == | equal |
| != | unequal |
| < | less than |
| <= | less-equal |
| > | greater |
| >= | greater-equal |
| ! | not |
| || | logical Or |
| && | logical And |
| ? | Conditional operator, e.g. x ? y : z, returns y if x is true, otherwise z |
Example
This formula allows e.g. to switch off the current depending on conditions:
M1.current >= 6,5 ? M1.current : 0
The current of M1 is supplied if it is greater than 6.5 A and 0 otherwise, which pauses the loading.
For such conditions it is also useful to query inputs (see below).
The following names are possible:
Mx: Meter with device ID x, e.g. M1
Ex: Charging point with device ID x, e.g. E1
You can access virtual counters, like solar surplus, mains supply or "Power avail. for EVSEs" (power available for charge points), by setting up the counter and then using the corresponding device ID in the formula.
Using dot, one can then access the individual values of the devices. These are called as follows:
current_l1 Phase 1 current in A
current_l2 Current of phase 2 in A
current_l3 Current of phase 3 in A
| current | Current of the current phase in A. In case of charging rules Lobas queries all phases one after the other, in case of meters of type "Expression" the respective phase to which the formula refers is valid. If a formula has been specified for "Current L1", the fields for Current L2 and L3 can be omitted. Then the formula for current L1 is used. |
| power_va | Current power in VA |
| import_wh | Energy drawn in Wh |
| export_wh | Injected energy in Wh |
| dt | Time elapsed since the last past update (in seconds) |
| inputN | Input number N of the device, 1 = active, 0 = inactive |
| soc | SOC, charge level in percent (counter/memory) |
| txn_duration | Duration of the current transaction in seconds (charge point) |
| txn_energy | Charged energy of the current transaction in Wh (charge point) |
Example
M1.current_l1 Current of the meter M1, phase 1
E2.import_wh Consumed Wh of the charging point E2
E3.power_va Current charging power of E3
If you use the formulas for a meter of type "Expression", you can also omit the device ID. The field names refer to this meter, e.g. 'power_va' is the power of this meter in Watt/VA.
A current list of supported chargingstations can be downloaded here.
Examples
By means of 'dt' extended functions can be realized, e.g., in a counter of type "Expression":
- As formula for 'import_wh': import_wh + M1.power_va * dt / 3600
updates the sourced energy based on the power during the past update time - As formula for 'power_va': (power_va * (20 - dt) + M1. power_va * dt) / 20
smoothes the power over the last 20 seconds.
Global date variables
| date.year | Current year |
| date.month | Month from 0.-11 |
| date.day | Day from 1-31 |
| date.weekday | Weekday Mon=0, Tue=1, … Sun=6 |
| date.yearday | Day in year from 0..365 |
| date.hour | hour from 0-23 |
| date.minute | Minute from 0-59 |
| date.second | Second from 0-59 |
| date.daysecond | Second of this day from 0-86399 |
| date.dayminute | Minute of this day from 0-1439 |
| date.dst | 0 = winter time, 1 = summer time |
Lobas variables
These variables can be set by the admin under "Configuration". For example, if the admin sets the variable 'var_x' to 1.5, cm.var_x will return the value 1.5.
Examples
Using the global objects:
charge 8A starting at 8:00am: date.dayminute >= 480 ? 8 : 0
charge 16A on Saturday and Sunday: date.weekday == 5 || date.weekday == 6 ? 16 : 0
Application example
The charge current is to be additionally limited regarding a consumption meter of an apartment. For this purpose, a charging rule can be set up with the formula 16 - M1. current. M1 is the meter that measures the consumption of the apartment. The charge manager first tries to provide the charging point with the maximum current with respect to the grid connection power, but then limits this to 16A minus the apartment consumption.
Help & Contact
Phone: +49 251 27 601 - 555
E-Mail: support@energielenker.de
Imprint
Copyright © by energielenker solutions GmbH
Publisher
energielenker solutions GmbH
Hafenweg 15
48155 Münster
Phone: +49 251 27 601 - 101
E-Mail: info@energielenker.de
Represented by
Tobias Dollberg
Christian Fuchte
Published in:
August 23